This tutorial is focused on the development of a CRUD & RESTful web application with MSSQL and ANGULAR-JS.
Part 2 - The RESTful data layer
Part 2 - The RESTful data layer
I have tried a lot of libraries to find an optimal setup to develop an enterprise application. This tutorial will guide you in the implementation of a strong and easily reusable platform.
[ Part 1 ] [ Part 2 ] [ Part 3 ] [ Part 4 ]
[ Part 1 ] [ Part 2 ] [ Part 3 ] [ Part 4 ]
Prerequisites
Download MSSQL Express2014
(jump this paragraph if you have already a working instance of MSSQL server)
(jump this paragraph if you have already a working instance of MSSQL server)
Download MSSQL Express 2014 from Microsoft site. I suggest the SQLEXPRWT version, so there is also Visual Studio inside.
Install it with the default setup, choosing hybrid authentication.
Install it with the default setup, choosing hybrid authentication.
Create the DB
Create the Movies database
Open visual studio and create a new DB named SampleDB.
Create the Movies database
Right-Click the new DB and create a new table SampleDB:
- CREATE TABLE [dbo].[SampleDB](
- [__v] [int] NOT NULL CONSTRAINT [DF_Movies___v] DEFAULT ((0)),
- [_id] [int] IDENTITY(1,1) NOT NULL,
- [title] [nvarchar](max) NULL,
- [director] [nvarchar](max) NULL,
- [releaseYear] [nvarchar](max) NULL,
- [genre] [nvarchar](max) NULL
- ) ON [PRIMARY] TEXTIMAGE_ON [PRIMARY]
Add some records:
- USE [SampleDB]
- truncate table [dbo].[Movies]
- INSERT [dbo].[Movies] ([title], [director], [releaseYear], [genre]) VALUES ('Star Wars: Episode 4', 'George Lucas', '1977', 'epic space opera')
- INSERT [dbo].[Movies] ([title], [director], [releaseYear], [genre]) VALUES ('Back to the Future', 'Robert Zemeckis', '1985', 'science fiction adventure comedy')
- INSERT [dbo].[Movies] ([title], [director], [releaseYear], [genre]) VALUES ('Raiders of the Lost Ark ', 'George Lucas', '1981', 'entertainment franchise')
Note that the truncate table command is used only to obtain records with the _id enumerated 1, 2 and 3.
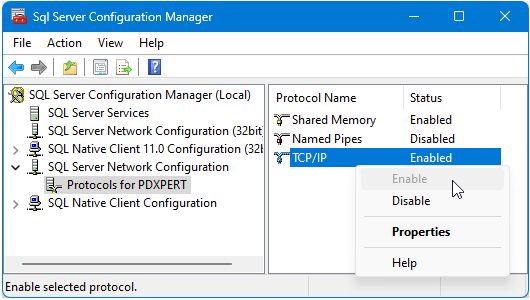
Enable protocols with the Sql Server Configuration Manager:
Set up the firewall for MSSQL protocols or temporarily disable it.
Our DB is ready and it's compatible with the attributes and datatype required by the MovieApp that we have seen in part 1 of this tutorial.
Create the data service layer
Use a template to accelerate
Goggling the web, I have found a very nice tutorial How to develop a complete REST service application using pure Node.js.
Read it to understand well the anatomy of a real RESTful service application.
Download the related example.
Open it and copy the entire content of SampleRest folder. Paste it inside our MyApp folder created inside the part 1 of this tutorial. The MyApp folder now contains:

Using the console go inside our MyApp folder and type npm install .
We have installed the library MSSQL.
Now we need to adapt the server to our entity movies.
Download these files from github.
Unzip and it and copy the content of folder MSSQL_CRUD_RESTful_ANGULARJS-master in our MyApp folder, replacing all preexisting files.
Now we need to change the password in the file settings.js replacing mypassword with the password of user sa (system administrator) that you have chosen during MSSQL Express installation. Save it.
It's time to see our data server in action: open a new console and type node app .
Now open Chrome and browse http://127.0.0.1:8000/movies .
It will show:
[{"__v":0,"_id":1,"title":"Star Wars: Episode 4',' A New Hope","director":"George Lucas","releaseYear":"1977","genre":"epic space opera"},{"__v":0,"_id":2,"title":"Back to the Future","director":"Robert Zemeckis","releaseYear":"1985","genre":"science fiction adventure comedy"},{"__v":0,"_id":3,"title":"Raiders of the Lost Ark ","director":"George Lucas","releaseYear":"1981","genre":"entertainment franchise"}]
That is the json content of our movies table in MSSQL.
Our data layer is working well. If not, double-check the exact sequence of operation of this paragraph.
Link the previous web app MovieApp to the local data server
Enjoy your MoviAppIf you see inside the service.js file the link to data server it's changed in http://127.0.0.1:8000/movies/:id.
This means that now we are disconnected from previous Internet data service and that we are ready to consume the local data service.
Launch the web server as seen in Part 1. Open a different console, go to the MovieApp folder and type . type node WebServer.
Browse http://127.0.0.1:8000 and see your app in action:
Enjoy it and try every application button!Read the tutorial "How to develop a complete REST service application using pure Node.js" it explains how to use MSSQL sever to do basic CRUD operations, there is also a video for you.
We have created a complete local CRUD, RESTful and SPA application. In the next post I will show how it's implemented and why it was necessary to respond to the OPTION request from our web application and then what is necessary to isolate the web server from the data server.
[ Part 1 ] [ Part 2 ] [ Part 3 ] [ Part 4 ]

No comments:
Post a Comment